Very common and typical problem when using SQL server auth mode (instead of windows auth mode).
In MSSQL you have a server user entity that is mapped to a specific DB user entity.
When you restore a DB for the first time, you need to create an MSSQL user and map it to your DB's user.
When you restore a DB in the following times (not the first time), you just need to re-map the MSSQL user to the DB user.
Creating an MSSQL user is pretty straight forward - just go to the security node of the server (not of the DB) and create a user with the same name that you have in the DB.
Mapping/Re-Mapping the user can be done using this script (for example we will use the db "mydb" and user "myuser"):
USE mydb
GO
EXEC sp_change_users_login 'Update_One', 'myuser', 'myuser';
GO
EXEC sp_changedbowner 'myuser'
GO
Monday, March 28, 2011

Friday, March 18, 2011
Tuesday, March 15, 2011
How to install an FTP Server on amazon AWS EC2
This seems to be a big issue as people usually waste a lot of time on this.
The problem lies with 2 elements: the security group settings & the ftp server settings.
FTP is not considered a good solution for passing files between EC2 instances and your computer as it is not firewall "friendly" - you can't just open port 21/TCP on the amazon security group settings because the server is actually sitting on a NAT address and when an ftp client connects to an FTP server using PASV mode then the server tells the client which port and which address to use for the data stream (like directory listing).
If you want an alternate easy solution for transferring files between yourself and the EC2 instance then setup a dropbox on both machines - it doesn't get easier than this... :)
If you still want to set up an FTP server on your EC2 instance then read on...
Typically, people just try to open port 21 and then try to connect and get something similar to:
Status: Server sent passive reply with unroutable address. Using server address instead.
Command: MLSD
Response: 425 Can't open data connection.
The solution is (and for this example I will explain how to perform the setting on FileZilla FTP server on windows):
0. Install an FTP server on your amazon instance. For this example i will be using FileZilla FTP server. Just download it(google) and do next->next->next .... until it is finished.
That's it, and just as side note, you don't need to use Elastic IP feature for this to work.
Also don't forget to set your client to use PASV mode (which is typically the default).
You can verify this works by reading the answer the server gives the client when it enters PASV mode:
Command: PASV
Response: 227 Entering Passive Mode (174,149,71,102,4,7)
This response means: "Yo FTP client, use 174.149.71.102 and port 4*256+7=1031"
The problem lies with 2 elements: the security group settings & the ftp server settings.
FTP is not considered a good solution for passing files between EC2 instances and your computer as it is not firewall "friendly" - you can't just open port 21/TCP on the amazon security group settings because the server is actually sitting on a NAT address and when an ftp client connects to an FTP server using PASV mode then the server tells the client which port and which address to use for the data stream (like directory listing).
If you want an alternate easy solution for transferring files between yourself and the EC2 instance then setup a dropbox on both machines - it doesn't get easier than this... :)
If you still want to set up an FTP server on your EC2 instance then read on...
Typically, people just try to open port 21 and then try to connect and get something similar to:
Status: Server sent passive reply with unroutable address. Using server address instead.
Command: MLSD
Response: 425 Can't open data connection.
The solution is (and for this example I will explain how to perform the setting on FileZilla FTP server on windows):
0. Install an FTP server on your amazon instance. For this example i will be using FileZilla FTP server. Just download it(google) and do next->next->next .... until it is finished.
1. Open FileZilla FTP server: Edit-> settings -> Passive mode settings:
(x) Retrieve external IP from:
http://ip.filezilla-project.org/ip.php
[ this tells the ftp server to perform a 'whatismyip' and give that to the ftp client, you can also specifically put the address DNS name you use in your remote desktop in the "Use the following IP:", e.g., ec2-6-100-129-60.compute-1.amazonaws.com ]
(x) Use custom port range:
1024-1048
[ these are the ports that will be given to the ftp client - we will open them in the following step in the Firewall ]
2. Amazon security groups: open ports -
a. Custom TCP rule , Port range:21
b. Custom TCP rule, Port range:1024-1048
3. Turn off the windows firewall on the EC2 machine (you don't need it - you have the amazon firewall)
That's it, and just as side note, you don't need to use Elastic IP feature for this to work.
Also don't forget to set your client to use PASV mode (which is typically the default).
You can verify this works by reading the answer the server gives the client when it enters PASV mode:
Command: PASV
Response: 227 Entering Passive Mode (174,149,71,102,4,7)
This response means: "Yo FTP client, use 174.149.71.102 and port 4*256+7=1031"
Sunday, February 20, 2011
Wifi connection problems on android on Samsung Galaxy tab
I have a Tplink router and I have noticed I get wifi connection problems when trying to connect to it using my Samsung Galaxy tab mini tablet. After a lot of checks, I managed to see that the problem is from the DHCP.
The problem happens only when using a secure network (WEP or WPA/PSK).
The problem was that after the phone would recognize the net and try to connect to it, it would say "Remebered" on the connection for a short period and them it would show "Disabled" without any reason.
Since the problem is in DHCP, and until they fix it, it can be soved by defining a manual IP address on the wifi settings of the tablet:
- Goto Settings -> Wireless and Network -> Wi-Fi Settings
- If your router is already shown in the list, "long click" on it and choose "forget"
- (ignore the entry if it re-appears automatically)
- Select Add Wi-Fi network
- Type the name of your network, set the security type (WEP or WPA/WPA2 PSK) and enter the password
- The network should appear now on the list, don't connect to it yet
- "long click" on your network entry, and then setup your ip address manually, choose one from the range defined in the router (e.g., 10.0.0.24 or 192.168.1.24) then set the network mask (typically 255.255.255.0) and then set the gateway and dns addresses - these should be the address of your router, the same address you put on your home computer browser to access the admin of your router, you can see it by opening a 'cmd' window on your computer and typing 'ipconfig' , use the same gateway address listed there for your phones gateway and dns settings.
Note: i noticed that getting the possibility to set your ip manually on the tablet is not consistent and it won't always give you this option when 'long clicking' on your network - you will hav to use trial and error.
The problem happens only when using a secure network (WEP or WPA/PSK).
The problem was that after the phone would recognize the net and try to connect to it, it would say "Remebered" on the connection for a short period and them it would show "Disabled" without any reason.
Since the problem is in DHCP, and until they fix it, it can be soved by defining a manual IP address on the wifi settings of the tablet:
- Goto Settings -> Wireless and Network -> Wi-Fi Settings
- If your router is already shown in the list, "long click" on it and choose "forget"
- (ignore the entry if it re-appears automatically)
- Select Add Wi-Fi network
- Type the name of your network, set the security type (WEP or WPA/WPA2 PSK) and enter the password
- The network should appear now on the list, don't connect to it yet
- "long click" on your network entry, and then setup your ip address manually, choose one from the range defined in the router (e.g., 10.0.0.24 or 192.168.1.24) then set the network mask (typically 255.255.255.0) and then set the gateway and dns addresses - these should be the address of your router, the same address you put on your home computer browser to access the admin of your router, you can see it by opening a 'cmd' window on your computer and typing 'ipconfig' , use the same gateway address listed there for your phones gateway and dns settings.
Note: i noticed that getting the possibility to set your ip manually on the tablet is not consistent and it won't always give you this option when 'long clicking' on your network - you will hav to use trial and error.
Wednesday, February 16, 2011
Using JQuery with Visual Studio ASP.NET when using master and content pages
Good article for beginners on how to use JQuery together with C# ASP.NET here.
Pay attention to the comments at the end if you are using a master page and content pages and pay attention you will need to use a different finder string to locate auto generated ASP.NET control IDs:
Comment posted by Konrad on Tuesday, January 05, 2010 10:23 AM
Something important when referencing server controls,
if you have a asp:Button control, $("#Button1") won't work.
You need to use this $("#<%= Button1.ClientID %>")
Adding the same code to a child page inheriting a master page..cause the page to referesh on postback
Using JQuery with ASP.NET comes to mind immediately when thinking of using a datetime picker control that is so much missing from the tools section of visual studio (the calendar control is really not a solution for most of us ! )
Pay attention to the comments at the end if you are using a master page and content pages and pay attention you will need to use a different finder string to locate auto generated ASP.NET control IDs:
Comment posted by Konrad on Tuesday, January 05, 2010 10:23 AM
Something important when referencing server controls,
if you have a asp:Button control, $("#Button1") won't work.
You need to use this $("#<%= Button1.ClientID %>")
| Comment posted by mayuresh on Wednesday, March 04, 2009 4:08 PM | |
Using JQuery with ASP.NET comes to mind immediately when thinking of using a datetime picker control that is so much missing from the tools section of visual studio (the calendar control is really not a solution for most of us ! )
Wednesday, February 9, 2011
How to disable windows Internet Explorer Enhanced Security Configuration
When you freshly install windows 2003, "internet explorer enhanced security configuration" is on by default which makes your life hell when you try to browse the web and doesn't let you download firefox either (because clicking download on firefox each time triggers a different server that needs to be authorized by adding it to the allowed sites).
To solve this issue, and just download a normal browser such as firefox, simply go to control panel -> add /remove programs -> add/remove windows components -> uncheck "internet explorer enhanced security configuration" -> next,next,next .... finish -> download firefox
In windows 2008 it is a little different, Windows Server 2008 implementation of Internet Explorer Enhanced Security Configuration is configured through Server Manager. Select the root of the Service Manager navigation pane, and under the Server Summary click Configure IE ESC, which is part of the Security Information section. A dialog box appears, letting Internet Explorer Enhanced Security Configuration be enabled/disable separately for normal users and administrators.
To solve this issue, and just download a normal browser such as firefox, simply go to control panel -> add /remove programs -> add/remove windows components -> uncheck "internet explorer enhanced security configuration" -> next,next,next .... finish -> download firefox
In windows 2008 it is a little different, Windows Server 2008 implementation of Internet Explorer Enhanced Security Configuration is configured through Server Manager. Select the root of the Service Manager navigation pane, and under the Server Summary click Configure IE ESC, which is part of the Security Information section. A dialog box appears, letting Internet Explorer Enhanced Security Configuration be enabled/disable separately for normal users and administrators.
Sunday, January 9, 2011
Fixing paper jam problem with Xerox 3117 Phaser laser printer
Xerox 3117 Phaser has a problem when a paper is automatically loaded for printing it gets stuck half way through and then you need to pull it out physically.
I found a solution for this (heard it from an experienced printer servicing person), you need to take a strong tissue that doesn't tear easily (like baby wipes) and clean the the feeding roller (see pic below) and the rectangle below it (in the picture below the rectangle is under the pages) with some acetone or alcohol.

This worked like a charm for me !
You have to repeat the process every month or two.
And another good advice is always to have at least 15 pages in the feeder and not less - it helps loading the sheets.
I found a solution for this (heard it from an experienced printer servicing person), you need to take a strong tissue that doesn't tear easily (like baby wipes) and clean the the feeding roller (see pic below) and the rectangle below it (in the picture below the rectangle is under the pages) with some acetone or alcohol.
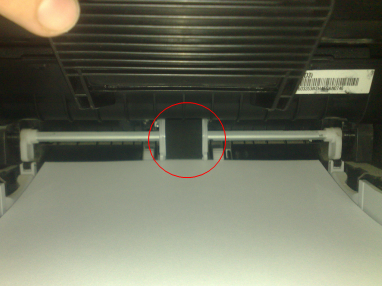
This worked like a charm for me !
You have to repeat the process every month or two.
And another good advice is always to have at least 15 pages in the feeder and not less - it helps loading the sheets.
Subscribe to:
Posts (Atom)